
AI Agents: Part 2 | Building a Health Coach Agent
- Pulkit Sahu

- Oct 13, 2025
- 5 min read
Updated: Oct 14, 2025
The entire agent workflow from concept to testing using OpenAI Agent Builder platform
AI Agents: Post 2 of 2 | Check Post 1 here
In the last post, we discussed the Brain, Body, and Actions of AI agents. You can read it here ✔︎.
In this second post of the two-part series, we’ll apply what we’ve learned to build a working AI agent using the newly launched OpenAI Agent Builder platform — a visual, drag-and-drop interface that lets you connect and place various components of agents, also called nodes, on the platform.
To keep things simple and practical, we’ll build a Health Coach Agent that can understand a user’s message and give useful health-related suggestions.
Quick Links

Overview — Our Agent Workflow
This is the total workflow of how our AI agent will look like after we completely build it. You can start building it here by creating a new workflow.
Start Node – receives user input (input_as_text)
Safety Belt (Guardrail Node) – checks for prompt-injection or unsafe inputs
Brain Agent – classifies the user’s intent
If / else Logic Node – routes the request to the correct branch
Action Agent – provides specific health advice or suggestions
Info Agent – handles general health queries
End Nodes – finish each conversation branch.
Step 1: Start and Safety Belt Nodes
The Start Node is where the agent begins. It captures whatever the user types into the chat interface as input_as_text. It also appends the user input to the chat history.
Next, we add (drag) a Guardrail Node — let’s name it Safety Belt. This node scans the user input for unsafe or “jailbreak” content before passing it to the Brain.
Input: input_as_text
Toggle: “Jailbreak Detection” → ON
Output: Pass or block the user message
Connect the Start node to the Safety Belt node with an edge (connection). If the Safety Belt flags the input as unsafe, connect it directly to an End Node to terminate the conversation gracefully.
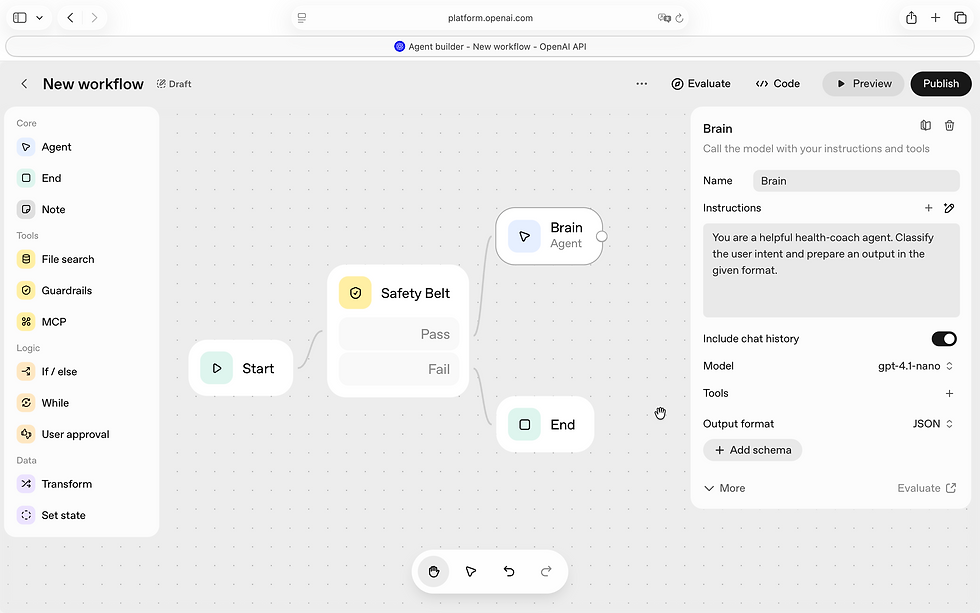
Step 2: The Brain Agent
Having done the above things, we will now implement the brain of our health coach agent. We’ll add the Brain (Agent) — the reasoning core of our Health Coach Agent.
Drag an Agent Node from the side panel and place it next to the Safety Belt node. Connect them via an edge. We’ll use gpt-4.1-nano as our model. This LLM (Large Language Model) will act as the brain of our agent.
Instructions (prompt):
You are a helpful health-coach agent. Classify the user intent and prepare an output in the given format.
Adjust model parameters like:
Temperature: 0.7 (for balanced creativity)
Max Tokens: 2048 (response length)
Top P: 0.95 (token sampling probability)
Output Format: Select JSON as the output format and rename it to brain_agent_output_schema. Under Properties, add a field named intent and set its type to ENUM. The possible values for this field include diet, exercise_suggestions, general, and others. Click Update — this finalises the output format.

This ensures that the Brain outputs structured data the rest of the workflow can read.
Step 3: If / else Logic Node (Body)
We will use If / else node that helps us in routing the intent to different agents. Drag an If / else node and connect it to the Brain. This node will route the workflow based on the user’s intent detected by the Brain.
Example conditions:
If: input.output_parsed.intent == "diet" → route to Action Agent
Else if: input.output_parsed.intent == "exercise_suggestions" → route to Action Agent
Else if: input.output_parsed.intent == "general" → route to Info Agent
Else if: input.output_parsed.intent == "others" → route to Info Agent
Else: connect to Info Agent
You can add more branches later as your Health Coach gains new capabilities.
Step 4: Actions
Actions are what the user actually experiences — the responses, insights, or recommendations our agent provides.
🩺 Action Agent
Drag another Agent Node and connect it to the appropriate branches of the If / else node. Again, use gpt-4.1-nano as the model.
Instructions:
Suggest the best possible advice or health tip based on the user’s request. Output the information in the required widget format.
Add context variables:
{{input.output_parsed.intent}}
{{workflow.input_as_text}}
🎨 Widget Output
Under Output Format, choose Widget and click Create New. This will open the Widget Builder Studio.
In the code editor, add something like:
<Card>
  <Text value={title} />
  <Text value={diet} />
  <Text value={exercise_suggestions}/>
</Card>
Add default data to preview the layout:
{
  title: 'Health Agent',
  diet: 'Take rest',
  exercise_suggestions: 'Walk',
}
Once satisfied, save and upload the widget. You’ll see a live preview of the card inside the Agent Builder.
Adjust model parameters like:
Temperature: 0.7 (for balanced creativity)
Max Tokens: 2048 (response length)
Top P: 0.95 (token sampling probability)
ℹ️ Info Agent
For general questions or fallback responses, create another Agent Node named Info Agent. Use gpt-4.1-nano again and adjust model parameters accordingly.
Instructions:
Provide simple, general health guidance to the user.
Output Format: Text.
Connect it to the input.output_parsed.intent == "general" , input.output_parsed.intent == "other" and Else branch of your If / else node, and then to an End Node.
Complete Connections and Test
Finally, connect and check all branches:
Action Agent → End Node
Info Agent → End Node
Your workflow is now complete!
Click ⏵ Preview, type something like “Hello” or “I feel tired lately”, and press Enter. Watch the nodes highlight one by one on the left — showing the agent reasoning and acting in real time.
Summary
You’ve just built a functional Health Coach Agent that:
Filters unsafe input through a Safety Belt
Uses a Brain Agent for intent detection
Routes requests intelligently via If / Else Logic
Responds with structured advice using an Action Agent
Handles general queries with an Info Agent
This modular design makes your agent easy to expand — you can add new tools, integrate APIs (like fitness trackers), or connect a memory database for personalised coaching.
Next Step
In the next extension, we may enhance the Health Coach Agent with:
Memory, to recall past sessions
Analytics, to track progress
Feedback Loops, to make it smarter over time
We’ve now learned how to build an AI agent using the Brain–Body–Actions framework, powered by the newly launched OpenAI Agent Builder and Widget Builder Studio.
This concludes our two-part series on AI Agents. I hope this guide helped you understand the core concepts, gain hands-on experience, and strengthen your skills in designing and orchestrating intelligent agents.
Happy learning and building!
References
Sources
OpenAI Agent Builder – Official Guide https://platform.openai.com/docs/guides/agent-builder
OpenAI Node Reference Documentation https://platform.openai.com/docs/guides/node-reference
OpenAI Agent Builder Safety Guide https://platform.openai.com/docs/guides/agent-builder-safety
Introducing AgentKit – Build Smarter, Actionable Agents https://openai.com/index/introducing-agentkit/
Sample Workflow (Shared Reference) https://share.google/CVaxP74j7heOn53A5


Comments